Getting started
Take a new organization from empty to its first conversation in about 30 minutes: an address that works, the inboxes your company needs, your team, an AI agent and a test email in each direction.
This page is for administrators, and for an organization that answers email. One that only sends from its apps (receipts, invitations, notices) has its own first steps on All sending (First steps for sending from your app).
You can do every step in the web app, or let your own AI agent do most of them for you over MCP. Each step below shows both routes; Let your AI agent set it up explains the agent route from start to finish.
Home follows the same order. While setup is not finished, it shows Getting started with three steps: Claim your addresses, Staff them with an AI agent and Stay in charge. The next step to do is highlighted, and each one opens the screen that completes it. Under the steps, When you’re ready links to Connect your domain, Connect an app and Invite someone. Once every step is done, the list goes away on that device. To put it away sooner, choose the × next to its title (Hide getting started).
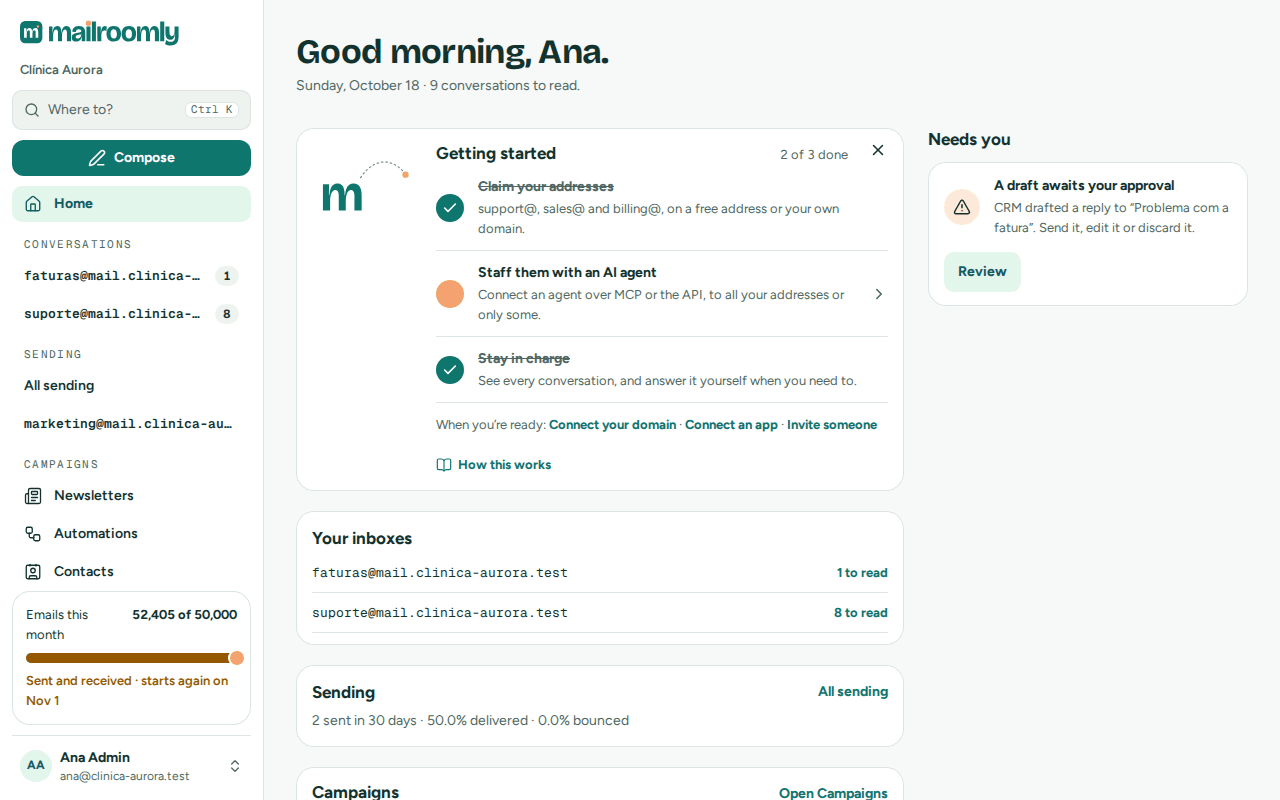 Getting started on Home: the next step is highlighted
Before you start
Have these at hand:
- A work email you'll keep: you open the organization with it (step 1), and it is your address as its administrator.
- The addresses your company needs, for example
support@,sales@andbilling@. - The email addresses of the people who will answer them.
- An MCP client for your agent, such as Claude, ChatGPT or Cursor, if you want an AI agent to answer or to help with the setup.
- Access to your domain's DNS, if you want to use your own domain today. Without it, start on the free address and connect the domain later: nothing you set up is lost.
Let your AI agent set it up
As an administrator, you can hand most of the setup to your own AI agent. It works through Mailroomly's MCP server, as you, with the administration areas you give it, and it asks before each change.
-
Create a token for the agent. Open Settings › My agents (also in the account menu, under My agents) and choose Create token. In Create a personal token:
- Name: something you will recognize, for example "Setup agent".
- Access: tick List addresses and Read conversations, so it can check that a test email arrived.
- Administration (optional): tick what the setup needs. For a full setup: Read the organization, Manage domains, Manage addresses, Manage apps and Manage the team. The sheet then says This agent can change your organization.
- Expires: a short period, such as 30 days, is enough for a setup.
Choose Create token. The token is shown only once: copy it now, then choose Confirm the token is stored.
-
Connect your MCP client. The token's sheet and Plug it in, on My agents, have the configuration ready to paste for Claude Code, Cursor, JSON (other MCP clients) and cURL, with the MCP server URL. See Connect a client.
-
Ask it to set up the organization. Write "Set up the organization", or use the prompt Set up the organization (
set_up_organization) if your client lists prompts. Give it your domain if you want to use one; without it, the agent starts with the free address.
The agent first reads where your organization stands (get_organization_overview) and skips the steps already done. Then it goes through the steps on this page in order: the free address or your domain and its DNS records, the addresses, the team and their access, an app and its key, and a test email to you. Before each change, it tells you what it is about to do and waits for your go-ahead.
Important
Some things always need you, signed in to Mailroomly. The agent cannot create tokens for other agents, make anyone an administrator, delete anything, create keys that read mail, send an address's mail to an app or a webhook, accept the terms of service, or export or close the organization. When it reaches one of these, it tells you so and you do it in the web app. The full list is in What stays with a signed-in person.
Every administrator gets a notice when you create a token that administers the organization (AI agent token that administers the organization), and another for each API key the agent creates. Revoke the token in My agents once the setup is done.
1. Sign up
- Choose Start for free on the website, or Create an organization on the sign-in page. Create your organization opens.
- Enter Your name, your Work email and the Organization name: your company, or the client you set it up for. Names can't hold a web address (such as www.example.com): the email goes to whatever address is typed in.
- Choose how you'll sign in: With a password (at least 12 characters) or With a code by email, with no password. Or, above the form, Sign up with Google, Sign up with Microsoft or Sign up with LinkedIn, when Mailroomly offers them.
- Accept Mailroomly's terms of service on behalf of the organization, and choose Create organization.
- Check your email: enter the 6-digit code we sent in the six boxes, or open the link in the email and choose Open my organization. The code and the link work for 24 hours. If nothing arrives, check your spam folder or choose Send a new code (after 30 seconds). Open the link in the same browser you signed up in: the password you chose is set only there. Opened anywhere else, your organization opens all the same, and you sign in with a code by email, or choose a password with Forgot your password?.
Nothing is created until your email is verified. Then the organization opens on the Free plan, as a New account in Sending trust (Plan and limits), and you land on Home, with Getting started. With Google, Microsoft or LinkedIn, the provider has verified your email already: you only name the organization and accept the terms.
| The page says | What to do |
|---|---|
| Use an address you’ll keep: temporary addresses can’t open an organization. | Sign up with your company's email, or a personal address you keep. |
| This address’s domain doesn’t take email. Check it for typos. | Correct the address. |
| Too many attempts. Try again in a few minutes. | Wait a few minutes. |
| We’ve sent too many codes to this address. Try again later. | An address gets at most 5 codes an hour and 20 a day from one network, and 50 a day from all (Signing in). Try again later. |
| You’ve opened as many organizations as one person can in a day. Open the next one tomorrow. | One person opens at most 10 organizations in 24 hours. |
| New organizations are paused for a moment. Try again shortly. | The Mailroomly team paused signups for a short while. Try again later. |
With a paid plan picked on the website. After the code, the page sums up the plan: Continue to payment opens the payment, and Start on Free instead takes you to Home. You can choose a plan later, from Plan (Plan and limits).
If you already have a Mailroomly account with that email, signup opens a new organization for that account, which keeps the ways in it has: a password typed on the form is never set on it. You can also create an organization while signed in, when you are in none: the screen that says so has Create an organization. Someone who was invited accepts the invitation instead of signing up: Accepting an invitation. Everything about signing in is in Signing in.
2. Choose the free address or your own domain
Your addresses live on a domain. You have two options, and you can use both:
| Free address | Your own domain | |
|---|---|---|
| Ready | In a minute, with no DNS work | Once its DNS records are published and checked: from a few minutes to a few hours |
| Looks like | support@yourcompany.<platform domain> |
support@yourcompany.com or support@mail.yourcompany.com |
| Sends | Transactional email only, up to 100 recipients a day | Transactional email, and marketing when your plan includes it, within your sending trust |
| Receives | Always | When you set it to Sends and receives and publish its MX record |
Start on the free address when you want to work today or don't control your DNS yet. Connect your own domain when you are ready to send under your brand, send marketing or send more. Each organization can have one free address. See Free address and Your own domain.
Warning
Receiving on a domain sends all of its mail to Mailroomly: once its MX record is published, mailboxes for that domain anywhere else stop receiving. If your main domain already has mailboxes, receive on a subdomain such as
mail.yourcompany.comand keep sending from the main domain if you like.
In the web app
For the free address, the quickest way is Claim your addresses on Home (step 3): choose A free Mailroomly address, and it is created with your addresses. To create it on its own, open Addresses › Create a free address. In Create your free address, type the Name (3 to 30 lowercase letters, digits or dashes), check the full address under Your address will be, and choose Create address.
For your own domain, open Addresses › Connect your domain (or Connect your domain under When you’re ready on Home). In Add a domain, type the Domain, turn on Receive email if its addresses should receive, and choose Add domain. The domain's page lists the DNS records to publish where your DNS is managed: Copy all copies them, and Send by email sends them to whoever manages your DNS. Mailroomly checks by itself, and the domain shows Verified once the records are found.
Ask your agent
"Claim a free address named yourcompany." The agent uses claim_starter_address.
"Add the domain mail.yourcompany.com with receiving on, and email the DNS records to dns@yourcompany.com." The agent uses add_domain, then get_domain and email_dns_records. Once the records are published, "Check mail.yourcompany.com again" uses verify_domain.
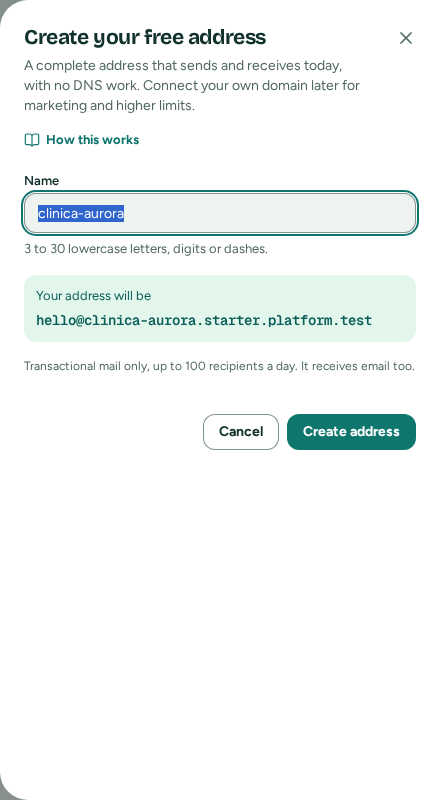 Create your free address: a name, and the full address it gives
3. Create your addresses and choose who answers
Create the inboxes your company starts with, then say who answers each one. Administrators see every address anyway; members see only the addresses they are given.
In the web app
On Home, choose Claim your addresses. Under Where, choose A free Mailroomly address (with the Name of your free address when you don't have one yet) or one of your own domains. Your own domain must be verified and have Receive email on: the sheet names the verified domains that don't receive yet. Under Addresses, support@, sales@ and billing@ are ticked: untick or rename any of them, then choose Create addresses. They send and receive at once.
To add one more later, open Addresses › New address, or choose Add an address in Where to?. See New address.
To choose who answers, open the address in Addresses and use Who answers › Add member, with Read only or Read and reply. You can also give access when you invite someone (step 4). See Who can open an address.
Ask your agent
"Create support@, sales@ and billing@ on yourcompany.com, with the display names Support, Sales and Billing." The agent uses create_address for each.
"Give Rita read and reply access to support@." The agent uses set_address_access.
4. Invite your team
Invite the people who answer your addresses as Members, and anyone who runs the organization with you as Administrators. Each invitation is valid for 7 days. People count towards your plan's limit of people (Plan and limits).
In the web app
Open Team › Invite someone (also under When you’re ready on Home, and in Where to?). Type the Email and Name, and choose what they can reach: Everything, or Only what you choose. Choose Send invitation. See Invite someone and What each person can reach.
Ask your agent
"Invite rita@yourcompany.com as a member, and give her read and reply access to support@." The agent uses invite_person, then set_address_access.
Important
An agent invites members only. To invite an administrator, or to make a member an administrator, sign in and use Team.
5. Connect an AI agent
An AI agent reads your addresses and answers them over MCP or the API. Choose who it works for:
- As you: your own assistant, such as Claude on your laptop, acting as you on your addresses with a personal token. You create it in Settings › My agents.
- For the organization: a support or sales agent that acts as no one in particular, with a key of its own, like an app. Administrators connect it in Apps › Connect an AI agent › For the organization.
Staff them with an AI agent, on Home, opens My agents with Create a personal token ready (or Connect an app when personal tokens are turned off for your organization). In Where to?, Connect an AI agent asks who the agent works for.
For an agent that works as you:
- In Create a personal token, give it a Name and the Access it needs: List addresses, Read conversations, Leave drafts for approval and Reply and write emails.
- Under Which addresses does this agent handle?, keep All my addresses, or choose Only the ones I choose, for example only
support@. - Choose Create token, copy the configuration for your client, and choose Confirm the token is stored.
For an agent that works for the organization, choose How it replies: Replies on its own, or Leaves drafts for approval, where every reply waits for a person. You get its API key and the settings for your agent.
Tip
Start with drafts for approval: give a personal token Leave drafts for approval without Reply and write emails, or choose Leaves drafts for approval for the organization's agent. Every reply then waits in the inbox for you to send, edit or discard, until you trust it to answer on its own.
Important
Only a person signed in to Mailroomly creates tokens and the keys that read mail. An agent cannot connect another agent.
Details: Personal tokens, An agent for the organization and Connect a client.
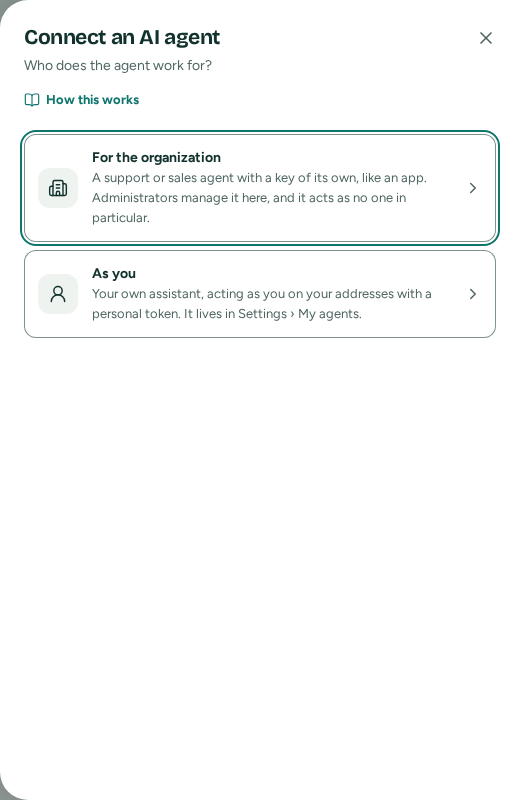 Connect an AI agent: for the organization, or as you
6. Send a test email and receive one
Check both directions before you announce the addresses.
In the web app
Send. Open Where to? › Send a test email (or, on Home, Send yourself a test email to see its route. on the Your address already works card). Choose From (one of your addresses), To (you), a subject and a body, then Send test. The result says Email accepted, and Open the email and its timeline follows it: Accepted, Sent, Delivered. A test sent as you doesn't reach your apps' webhooks. See Test email.
Receive. From another email account, such as your personal one, write to support@ on your address. Shortly after, it arrives in Inbox: in Needs you, or With the agent when an agent handles the address. Reply from there to check the way back. Once an email arrives, Stay in charge on Home is done. See Inbox.
Ask your agent
"Create an app called Website and send me a test email from support@yourcompany.com." The agent uses create_app, then send_test_message, which sends to you. An agent's test email always comes from an app.
After you write to support@ from another account: "Show me the newest conversation in support@." The agent uses list_threads, then get_thread, which needs Read conversations.
7. What to watch in the first days
- Home: Needs you lists open notices and agents' drafts waiting for your approval. Last 30 days shows sent, delivered and bounced email; bounces are highlighted from 5 %.
- Inbox: conversations that need a person are in Needs you. A conversation waits for the agent for a while, 30 minutes by default, then shows there.
- Notices: what needs attention in your sending, and what to do about it. Administrators also get them by email. See Notices.
- Plan › Sending: a new organization starts as a New account, with a daily cap on recipients. It becomes a Trusted account by itself after a while of good sending on your own domain. Plan a large send with this in mind. See Sending trust and Daily limits.
- Activity › Blocked: addresses Mailroomly doesn't send to, and why. A list full of bounces points to an old or bought list. See Blocked.
- My agents: revoke the setup agent's token once its work is done.
Your agent can keep watch too: "How is the organization doing?" uses get_organization_overview, get_deliverability and list_alerts, with Read the organization.
Next: Finding your way around the web app, and the Inbox for the people who answer.